Showing posts with label WINDOW -7 TRICKS. Show all posts

Thursday, 7 June 2012

Transform Windows 7 Logon Screen to Mac OS X Logon


Few days back we had shared the tweak to Transform Windows 7 Logon Screen into Windows 8.Which was great.Now we thought to Transform Windows 7 into Mac OS X.This New Logon Screen is similar to Apple's Mac OS X Logon screen.You can have a look on the Mac OS X Logon Screen in below image:

transform windows 7 logon screen to Mac OS X logon


Transform Windows 7 Logon Screen to Mac OS X Logon Screen
  • First of all go and download Mac OS X Logon Screen from below download link:
                                                                  Download
  • Now go to "C:\Windows\System32" folder.
  • In System32 folder search for authui.dll and take the Ownership of it.
  • To take Ownership,Select Properties and then Go to –> Security –> Advanced –> Owner tab-> Edit-> Select your Administrator account and click OK.
  • After taking the ownership of authui.dll rename it as authui_old.dll or with any other name that you want.So that if anything goes wrong than you can revert back.
  • Now extract the downloaded .rar file and copy authui.dll from appropriate folder {from x64 or x86} to  "C:\Windows\System32"
  • Now you are done.Just restart your PC and see the new Mac OS X login Screen.
Don't forget to Join the Discussion Group on Mac OS X Logon Screen and Windows 7 Logon Screen below in comment section.

If this Helped you! Please take few Seconds and share it.

Tuesday, 5 June 2012

How to Create System Image in Windows 7

Creating System image is very helpful in Windows 7. Any day it can happen,that our system can get infected with very bad viruses and we need to format our computer.At that moment System image can help us a lot to restore all our Documents,pictures,videos and musics.
Microsoft has improved the Backup and restore Service in Windows 7 as comparision to Windows Vista.Now,we can easily create full backups of our PC's.

How to Create System Image Disc in Windows 7
  • Click on the Start button and type backup and restore in the Search box and press the Enter key.
  • Now click on "Create a system image"

windows 7 system image
  • Now you have to choose,where you want to save the backup file and after choosing click on next.
  • Now click on "Start Backup"
  • After finishing the Backup Process,Now,Windows 7 will ask you to Create a System repair disc:Just insert a blank disc and after inserting the Disc click on Create Disc,and your repair disc will be created.
  • Now,just you have to keep your backup file to any save place.

If you have any problem or you want to ask anything then,do tell us by leaving your comments below.

If this Helped you! Please take few Seconds and share it.

Monday, 4 June 2012

Download Windows 8 Concept Transformation Pack For Windows 7

We are back with another Windows 8 style Metro Transformation Pack for Windows 7,which is known as Windows 8 Metro Skin Pack. Sonds like something Good,na!.This theme will totally give you the experience of Windows 8 OS on your Windows 7 PC.
This Transformation pack will change your Windows 7 boot screen,icons,system information and much more.
You will get all the things related to Windows 8 in Windows 7.Hameed has done an excellent job regarding this theme.
He has used awesome icons,boot screen etc,to make this theme be like Windows 8.
You can have a small preview on this theme below.

Totally transform Windows 7 into Windows 8 GUI


You can download "Windows 8 Concept" transformation Pack from below download link:


Check out more transformation packs
Don't forget to share your views on this Skin Pack below:

If this Helped you! Please take few Seconds and share it.

Sunday, 20 May 2012

Hide your folder in Windows 7 with the three easy ways

Data protection and the privacy is a great challenge now a days. It is very necessary protect your personal and private data on a safe place. You can simply hide you data into your computer only without anyone's knowledge. Below are the three simple and quick methods by which you can hide your data in your hard disk. These three steps are as follows-
Hide your Folders -
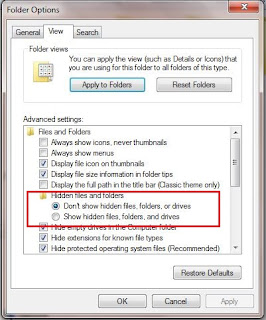
  • Firstly, open your windows explorer and be sure that "Do not show hidden items" menu is active.
    hide files 1

  • You can confirm it from Tools > Folder Options > View tab and then click on "Don't show hidden items, folders and drives" if not before.
  • Click 'OK'.
Now, you can hide your folders and files.
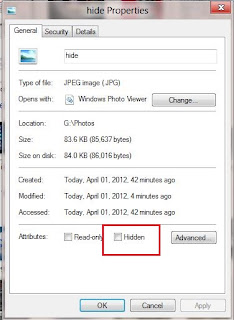
  • Right-click on the folder which you want to hide.
  • Click on the 'properties'.
  • Under the 'Attributes' menu, tick on the 'Hidden' attribute and then click 'OK'
    hide files

  • .Now, your particular folder is invisible.
If you want to show your hidden folder, then tick on the "show hidden folder and files" to show it temporarily.
Make folders invisible -
You can make your folder invisible which will not be visible to anyone but accidently someone could see also. You can perform this act by the following steps-
  • Select the folder which you want to make invisible and click F2 to rename it.
  • Now enter '0160' using the numberpad by holding "Alt" key.
  • This will create the folder without any name.
  • Now go to Properties > customize > Change icon and select an invisible icon for it and click 'OK'.
  • Now, your folder will be invisible.
Hide your Folder by LockBox -

lockbox for windows

This is a tool which help you to hide and lock your folders. You will be asked for a password when using it first time. In the free version, you can hide only one folder. You can lock, unlock and hide with LockBox.

Don't forget to leave your views!

If this Helped you! Please take few Seconds and share it.

Saturday, 19 May 2012

Download Metro Style Start Menu for Windows 7

Do you like new Windows Metro User Interference,then here is something interesting for you.If you remember few days back we had shared Windows 8 metro transformation pack.Now here is a cool application!,which will make your Windows Experience  really smarter.

metro style start menu


" mStart" is in beta,So,it will be sure that you will find some bugs in that..This metro style start menu really looks awesome.Below is some of the features of "mStart Beta version.".Thanks to SoloDev@DA for making this possible.

Features of mStart Beta version
  • Totally a metro style UI
  • You can customize the color and settings,as you want
  • The Setting windows is really easy to use
  • You can add any item to favorites by just right clicking on it
  • Just click on the "User Icon" to open up the Control Panel
  • as it is in Beta version so you will get some bugs or errors
You can download "Metro Start Menu" from below link:

So,what do you think about this application.Leave your problems or views below...

If this Helped you! Please take few Seconds and share it.

Totally experience Metro UI or Windows Phone 7 in Windows 7

So, do you like the new Windows 8 metro UI user interference or not ? If yes then here is something interesting for you.Here is a small tool which will give you the new Windows 8 Metro UI experience in Windows 7.It's really awesome application for Windows 8 lovers,who want to get the new Windows Metro UI in Windows 7.


The tool is " Rainmeter".Rainmeter displays customizable skins, like memory and battery power, RSS feeds and weather forecasts, right on your desktop.If you don't like the default Rainmeter look,then you can also anytime change that with Rainmeter skins.
The Rainmeter skin called as "Omnimo" is awesome skin which is easy to use and fully responsive.There are different Omnimo sub themes to choose from.


The right Omnio theme in the above picture is for getting Windows phone 7 in windows 7,middle one is for getting Windows 8 UI and 3rd one is fully customizable start screen.
There are many variety of panels to choose from like clocks,media controls,PC info,internet applications etc.
With Bing new feed,you will be upto date with the latest updates on your Interest.
Enjoy this great tool and don't forget to share your views on this tool by commenting below.


If this Helped you! Please take few Seconds and share it.

All about Windows 8 Run Mac OS X Lion like app launchpad in Windows 7

Mac is a very interesting OS which provide many facilities to its users, like music editing, 3D arts, photo editing, etc. Specially Mac OS X Lion has the great features. From all these, "XLaunchpad" is one of these feaures which runs all the pinned app in it like the Iphone's application launcher.


'XLaunchpad' is a software which allows you to run the Mac' launchpad into your Windows 7 Operating System. After downloading the software, you can run this by placing your cursor to the upper-left corner of the screen. It will automatically appear. You can select the programs to run which is pinned by default. You can also pin the programs by yourself. To do so, you have to right-click on the Launchpad and then on "Add" button, you can add the predefined programs or you can also browse the programs according to your choice. One thing you have to keep in mind that it will not accept the shortcuts, it will only accept the direct link of the programs.


You can also create folders for a group and you can also create new page by clicking on the "New Page" on the right-click context menu
.

You can adjust the size of the icons by going to the view >> and then choose size which you wanted to select. You can also control the settings of the launchpad by clicking on the settings on the right-click context menu or you can also go to the settings by clicking on the Task Bar icon.


You can download this software by clicking on the following link...

Leave your comment and express your views....

If this Helped you! Please take few Seconds and share it.

Friday, 18 May 2012

Download Bing Application for Windows 7

Microsoft is hitting the Web day by day.Recently it has launched a great application for Windows 7 related to it's search engine Bing.The Bing application is awesome for Windows 7 users.The app features the daily, and usually awesome, Bing wallpapers, which can be automatically set as your desktop wallpaper.Another interesting thing is the Bing search bar, which can be situated in the top-middle of your desktop or it can be placed at the top of the screen.
bing desktop apps for windows 7


The great thing about Binng Application is that it automatically disapper the Search bar when users click on something else or open any window.So,it can be non annoying feature.It doesn't disturbs you in the mid of your work.

If you love Bing,then you should checkout this application!
You can download Bing Search Bar application for Windows 7 from below:

So,what do you think about this application! leave your views below..

If this Helped you! Please take few Seconds and share it.

Download Awesome Longhorn Skin Pack For Windows 7

After our previous transformation pack on Angry Bird Space,we are back with another great Transformation pack for Windows 7.Longhorn is really an awesome skin pack which will make your Windows 7 Desktop look great.
A very great thanks to hamed for making this beautiful transformation pack.When you will install "Longhorn Skin Pack" in your Windows 7 PC,then you will find new Login screen,Windows explorer and other stuffs..
Following are the Operating system which supports "Longhorn Skin Pack"
  • Windows 7 
  • Windows 7 SP1 - [X86_X64] - [All Language] - [All Version]
Have a look on this theme in the below image

longhorn windows theme
You can download "Longhorn Skin Pack" from below link:


Don't foget to share your views about this theme below..

If this Helped you! Please take few Seconds and share it.

Download "Crystal Skin Pack" for Windows 7

This is an amazing skin pack for Windows 7 which transforms your Windows 7 to look like the crystals. We had shared many transformation packs with you like Longhorn skin pack, Valentine skin pack, Simplify Skin pack but overall, this is the awesome of all these. This skin pack will give a ultimate transparent crystal type UI which very smooth for eyes as well. You can use Crystal Skin Pack for Windows 7 32/64 bit version.

crystal skin pack
The Crystal skin pack will change the whole look of your Windows pc like Windows theme, icons, login screen, boot screen etc. The Crystal skin pack also comes with some useful system utilities like RocketDock, Y'z Shadow, etc.

Crystal windows 7
The Crystal skin pack is available for download to any version of Windows 7 with or without SP1 and both 32-bit and 64-bit versions. You can download this skin pack from the below link..

For Windows 7 32-Bit (x86) - 

For Windows 7 64-Bit (x64) -
Don't forget to share your views below...

If this Helped you! Please take few Seconds and share it.

Transform your Windows 7 and Windows 8 Consumer Preview into Mac OS X Mountain Lion

This is the Transformation pack which will transform your Windows 7 and Windows 8 Consumer Preview into Mac OS X Mountain Lion. It is not yet launched but user could use it by transforming their Windows in to this OS. You can download this Transformation Pack by clicking on the below links.
Links to download Mountain Lion Transformation pack -
Download for Windows 7 32-bit (x86)
Download for Windows 7 64-bit (x64)

Download for Windows 8 Consumer Preview 32-bit (x86)

Download for Windows 8 Consumer Preview 64-bit (x64)


Enjoy this awesome transformation pack and don't forget to express your views about this post...

If this Helped you! Please take few Seconds and share it.

Thursday, 17 May 2012

Download Battery Bar for Windows 7

There are many of us which are using Windows 7 into Laptop or any other gadgets which shows battery bar.If you are also using these type of Devices then here is a great freeware tool for you.A very great thanks to Kishan-Bagaria for creating this tool.
"Windows 7 Battery Bar" is a free tiny portable tool that monitors the status of your Computer battery and displays it in the taskbar in a very good manner.To customize the settings click on the the Battery icon in the system tray. You have the option to change the battery bar color to Red, Green, Yellow & Auto.
battery bar for windows

You can download it from below link:

So,what do you think about this apps,leave your views below..

If this Helped you! Please take few Seconds and share it.

How to Upgrade from Windows Vista to Windows 7

Recently Microsoft has officially announced that it has now ended the support to Windows Vista.So,due to that many of us are upgrading our system to Windows 7 or due to any other reason.Many of us are successful in upgrading our system to Windows 7 and many of us are not able to do that.Seeing that we thought to share a tutorial which will show you How to Upgrade to Windows 7 ?
Please note
at beginning we need a Internet Connection for doing this task complete.
How to Upgrade from Windows Vista to Windows 7
  • Insert Windows 7 Installation disc into your Computer and run the Installation Process.
  • Now click on the "Check Compatibility Online"
Windows 7 Setup

  • It will make you to download and Install "Windows 7 Upgrade Advisor" after installing that! Run it.
  • Now after opening the "Windows 7 Upgrade Advisor" click on the "Start Check" option.
Windows 7 Upgrade Advisor

  • It will generate a Report,If an issue is found in the Report,check the details to know how to resolve it and run the Advisor again until no issue is found by clicking the "Start again" button.
  • When there is no issue in the "Windows 7 Upgrade Advisor" report then you can go ahead to next step.
  • Now install Windows 7 as normally you do! 
Run Windows 7 Setup -> Install Now -> Go online or Do not get the latest updates -> Upgrade

Upgrade to Windows 7

  • Just Enjoy your new Upgraded OS.

If you are facing any problem then don't forget to share it by commenting below...

If this Helped you! Please take few Seconds and share it.

Monday, 14 May 2012

Procedure to Use Google Maps on Windows Phone 7

Just Follow the below procedure to use google maps on windows phone 7 
1.From the home screen of your Windows Phone 7, you first need to swipe the screen to the left hand side so that you can get into the applications as well as the various settings which are there on your Windows Phone 7
2.Once you are into it, you just need to find an option called “gmaps” after which just tap on the same to open the Google Maps application.
3.As soon as you open the application of the gmaps, you will see that the maps database will be loading and depending upon the internet connection the maps will be loading in quite a while.

4.After sometime, you will have to go to the lower end of the screen and need to tap on the first option after which the current location of you will be rendered and then your current location will be shown on the screen.
5.Now, when your  actual location is shown, now you may want to search for a place to where you wish to travel. Just enter the location where you wish to go after which just tap on the “Go” option. It will search for the location for quite a while as the data will be rendered depending upon the Internet Speed.

So, now in this way you can search for the locations on the Google Maps, after searching if you wish to calculate the distance to that place then tap on the car option to calculate the distance and then you can plan your travel accordingly. If your still confused then watch the video.

Saturday, 12 May 2012

Transform Windows 7 into Mac OSX Mountain Lion Skin

Skin packs are used to give a bright and unique look to your old and bored Windows interface, applying any transformation pack will simply update your wallpaper, change icons, sounds and adding a nice graphical user interface. We have already posted many themes and skin packs for Windows 7 which you can check out. Well today we are providing another Mac OSX Mountain Lion Skin Pack for Windows 7 which will blow your desktop with HD pixels graphics.
mac osx mountain lion
Well you can download this skin pack in two different version 64 bit and 32 bit, so you can check out and download it from below. Installing this skin pack is really simply you just have to download and double click on it to start the setup procedure, after that follow the instructions in the setup and click next as mentioned at last click on install and let it modify all the elements of your PC with its own, make sure to reboot your PC after installation is completed.

Download Mac OSX Mountain Lion Skin Pack :

Change Default Downloads folder Target in Windows 7

Downloads folder in Windows 7 is folder which is usually kept in administrator account like c:/user/downloads which you might wanna change to your specific folder which can be like D:/Internet/Downloads, so if you also wanna change your default downloads folder than you can do that by following below simple guide.
Windows-Explorer-downloads
Downloads-folder-propertiesFollow below steps :
1. Just go to the URL which you wanna make target location for your default downloads folder like I wanted to make Downloads folder which is kept in D drive so I went to that drive and copied the URL to that folder from the address bar.
2. Now just go to your default downloads folder and than right click choose Properties than go to Location now just replace the default URL with your current URL and click on Apply.
3. Now it will ask you for your permission by showing you Yes and No option like below.
move-folder-permission
4. Now Just click on Yes and than your folder’s target location will be changed and now when ever you click on Downloads folder you will be on the folder you targeted on that will help you save some of your time.

Change your Windows Logon Image with Logon Changer

Windows 7 Logon Changer can help you in changing your Logon Image on your Windows machine in seconds. This small utility is so much useful that can be used on daily basis for making your desktop totally according to your taste. With just a choosing a image file can change your logon image on the go and hence this tool also gives you a option to test the exact width and height of the applied image.

windows-logon-changer
So you can see in the above image that this tool comes with really less options, you have a option to Change Logon Screen that’s the main option which allow you to choose a nice image from your PC, make sure that image is quiet big to fit your desktop or lappie screen and the another option to Test that applied image.
If you are happy with the changed image than you can close the software and test it practically by Logging Off and Logging in again, or if you wanna apply the default image just open this tool again and than click on Revert to Default Logon Screen.
Download Windows 7 Logon Changer Tool to your PC and extract it, now you will a .exe file click on it and press Yes, now just choose a image and enjoy new logon image.

Complete List of Run Commands for Easy Access in Windows


run-panel-cmdRun commands are really useful as it can open your services on the go by just inserting some key-words, well finding them manually from the control panel is a big headache, so we are bringing you some of the useful commands for the RUN Panel which will surely boost your work creativity.

A

Accessibility Controls - access.cpl
Accessibility Wizard - accwiz
Add Hardware Wizard - hdwwiz.cpl
Add/Remove Programs - appwiz.cpl
Administrative Tools - control admintools
Adobe Acrobat (if installed)- acrobat
Adobe Designer (if installed)- acrodist
Adobe Distiller (if installed)- acrodist
Adobe ImageReady (if installed)- imageready
Adobe Photoshop (if installed) - photoshop
Automatic Updates - wuaucpl.cpl

B

Bluetooth Transfer Wizard – fsquirt


C

Calculator - calc
Certificate Manager - certmgr.msc
Character Map - charmap
Check Disk Utility - chkdsk
Clipboard Viewer - clipbrd
Command Prompt - cmd
Component Services - dcomcnfg
Computer Management - compmgmt.msc
Control Panel – control


D

Date and Time Properties - timedate.cpl
DDE Shares - ddeshare
Device Manager - devmgmt.msc
Direct X Control Panel (If Installed)* - directx.cpl
Direct X Troubleshooter - dxdiag
Disk Cleanup Utility - cleanmgr
Disk Defragment - dfrg.msc
Disk Management - diskmgmt.msc
Disk Partition Manager - diskpart
Display Properties - control desktop
Display Properties - desk.cpl
Display Properties (w/Appearance Tab Preselected) - control color
Dr. Watson System Troubleshooting Utility - drwtsn32
Driver Verifier Utility – verifier


E

Event Viewer - eventvwr.msc


F

Files and Settings Transfer Tool - migwiz
File Signature Verification Tool - sigverif
Findfast - findfast.cpl
Firefox (if installed) - firefox
Folders Properties - control folders
Fonts - control fonts
Fonts Folder - fonts
Free Cell Card Game – freecell


G

Game Controllers - joy.cpl
Group Policy Editor (XP Prof) - gpedit.msc


H

Hearts Card Game - mshearts
Help and Support - helpctr
HyperTerminal – hypertrm


I

Iexpress Wizard - iexpress
Indexing Service - ciadv.msc
Internet Connection Wizard - icwconn1
Internet Explorer - iexplore
Internet Properties - inetcpl.cpl
Internet Setup Wizard - inetwiz
IP Configuration (Display Connection Configuration)- ipconfig /all
IP Configuration (Display DNS Cache Contents) - ipconfig /displaydns
IP Configuration (Delete DNS Cache Contents) - ipconfig /flushdns
IP Configuration (Release All Connections) - ipconfig /release
IP Configuration (Renew All Connections) - ipconfig /renew
IP Configuration (Refreshes DHCP & Re-Registers DNS) - ipconfig /registerdns
IP Configuration (Display DHCP Class ID) - ipconfig /showclassid
IP Configuration (Modifies DHCP Class ID)- ipconfig /setclassid


J

Java Control Panel (If Installed) - jpicpl32.cpl
Java Control Panel (If Installed) – javaws


K

Keyboard Properties - control keyboard


L

Local Security Settings - secpol.msc
Local Users and Groups - lusrmgr.msc
Logs You Out Of Windows – logoff


M

Malicious Software Removal Tool - mrt
Microsoft Access (if installed) - access.cpl
Microsoft Chat - winchat
Microsoft Excel (if installed) - excel
Microsoft Frontpage (if installed) - frontpg
Microsoft Movie Maker - moviemk
Microsoft Paint - mspaint
Microsoft Powerpoint (if installed) - powerpnt
Microsoft Word (if installed) - winword
Microsoft Syncronization Tool - mobsync
Minesweeper Game - winmine
Mouse Properties - control mouse
Mouse Properties - main.cpl


N

Nero (if installed) - nero
Netmeeting - conf
Network Connections - control netconnections
Network Connections- ncpa.cpl
Network Setup Wizard - netsetup.cpl
Notepad - notepad
Nview Desktop Manager (If Installed) - nvtuicpl.cpl


O

Object Packager – packager
ODBC Data Source Administrator - odbccp32.cpl
On Screen Keyboard - osk
Opens AC3 Filter (If Installed)- ac3filter.cpl
Outlook Express – msimn


P

Paint - pbrush
Password Properties - password.cpl
Performance Monitor - perfmon.msc
Performance Monitor - perfmon
Phone and Modem Options - telephon.cpl
Phone Dialer - dialer
Pinball Game - pinball
Power Configuration - powercfg.cpl
Printers and Faxes - control printers
Printers Folder - printers
Private Character Editor – eudcedit


Q

Quicktime (If Installed) - QuickTime.cpl
Quicktime Player (if installed) – quicktimeplayer


R

Real Player (if installed) - realplay
Regional Settings - intl.cpl
Registry Editor - regedit
Registry Editor - regedit32
Remote Access Phonebook - rasphone
Remote Desktop - mstsc
Removable Storage - ntmsmgr.msc
Removable Storage Operator Requests - ntmsoprq.msc
Resultant Set of Policy (XP Prof) - rsop.msc


S

Scanners and Cameras - sticpl.cpl
Scheduled Tasks - control schedtasks
Security Center - wscui.cpl
Services - services.msc
Shared Folders - fsmgmt.msc
Shuts Down Windows - shutdown
Sounds and Audio - mmsys.cpl
Spider Solitare Card Game - spider
SQL Client Configuration - cliconfg
System Configuration Editor - sysedit
System Configuration Utility - msconfig
System File Checker Utility (Scan Immediately) - sfc /scannow
System File Checker Utility (Scan Once At Next Boot)- sfc /scanonce
System File Checker Utility (Scan On Every Boot)- sfc /scanboot
System File Checker Utility (Return to Default Setting) - sfc /revert
System File Checker Utility (Purge File Cache) - sfc /purgecache
System File Checker Utility (Set Cache Size to size x) - sfc /cachesize=x
System Information - msinfo32
System Properties - sysdm.cpl


T

Task Manager - taskmgr
TCP Tester - tcptest
Telnet Client - telnet
Tweak UI (if installed) – tweakui


U

User Account Management - nusrmgr.cpl
Utility Manager – utilman


W

Windows Address Book - wab
Windows Address Book Import Utility - wabmig
Windows Backup Utility (if installed) - ntbackup
Windows Explorer - explorer
Windows Firewall - firewall.cpl
Windows Address Book - wab
Windows Address Book Import Utility - wabmig
Windows Backup Utility (if installed) - ntbackup
Windows Explorer - explorer
Windows Firewall - firewall.cpl
Windows Magnifier - magnify
Windows Management Infrastructure - wmimgmt.msc
Windows Media Player - wmplayer
Windows Messenger - msmsgs
Windows Picture Import Wizard (need camera connected) - wiaacmgr
Windows System Security Tool - syskey
Windows Update Launches - wupdmgr
Windows Version (to show which version of windows) - winver
Windows XP Tour Wizard - tourstart
Here ends the list of these useful commands, well hope that these commands really increase your productivity and hence fasten your work experience, enjoy and do share this post with all your friends.

Tuesday, 8 May 2012

Windows 7 Installation Guide Step by Step Explaination


Many of You are using computer for many days and also using Windows 7 as a operation system but yet dont aware of the installation of operating sytem to your computer.In this Post I am going to metion step wise installation of Windows 7

Many get afraid whenever format word come.As we know everybody love his computer/laptop so anything harm to our computer its really hurt all of us.


If anything wrong happen to our computer and we have to format it than we became sad and start thinging that farmating means losing all the data of your hard drive.


But its not completly true.Ya you will lose your Data but not the complete hard disk Data.If your computer is having three drive naming C: D: and E: and operating syatem file is present in C: Drive than it might be not necessary to formate the rest drives D: and E:. So you can save all Data present in D: and E:.


Unfortunatly if all Drive are infected with Virus than you should format the whole Harddisk but stll i prefer not to Format your PC because its not a easy task to Backup ur losed DATA.

I prefer not to format Your complete PC instead You can follow Steps mention 
here.

So if still your problem not solve after following the steps mention in 
link or any one want a fresh installation of windows 7 than here I am going to mention you steps followed to FORMAT your syatem using Windows 7 bootable CD/DVD.

Step 1.
 The first step should be you have Windows 7 bootable CD with you.Now insert this CD into Your DVD/CD drive and reboot your system.

Step 2.
 As soon as You reboot a message as shown in below figure should apear.Than You have to press any key without delay.

If you not showing this message than you have to manually change your boot order by pressing function key just after restarting your computer and select option boot from opticle CD/DVD Drive.

*NOTE
 for diffrent computer the function key may be diffrent it may be F9 in some cases or F2 in other.Its better watch your computer screen while it booting.It show the option down there at right or left corner of screen with message press F-x key for boot menu.


Step 3.

Now the next screen will come is shown bellow. so now you have to wait for sometime untile the OS check all drive and configuration of computer and start copying file to ur local drive.


Step 4.


after this you will be encounter the below screen.You have to just press next button here.


Step 5.


When this screen come click the Install now button.Dont care about rest of option they are really dont mean anything. :-)


Also accept the user aggriment by applying Tick mark in front of check box.


click on next.

Step 6.


two option will be shown to you click on the custome/advance option if you want fresh insallation.If you want to upgrade your existing Operating System then use upgrade option.(upgrade means if you already have a windows basic version than you can upgrade it to the Windows ultimate version and so on)


Step 7.


Now The Drive Option will be shown in front of you.OS ask you that in which Drive You want to Install Your Os.


Note:- Here You can create a new Drive and also delete a drive.Just Click on the Drive option Link shown their.


 You can click on the Driver Option link there which show you following option-


You can Create a new Partition by clicking a new link present their and then allocating the desire size to it.

you can format the Desire Drive by using format option.
similarly you can Delete any partition by clicking on the Delete button.
After That You have to select the Drive in which you actually want to install the operating syatem(Windows 7)

Select the correct drive from shown drive and then click one next button.


You may be encounter with this dialoge box after clicking the next.Click ok and procced.


After Pressing ok to above the below window will appear and your installation will start
wait for few minut(20 min approx) and then your computer will restart autometically.


Step  8.

After the reboot the computer will autometically continue with its installation.You Dont have to do anything during this.So wait until the next screen come.


Wait for few time until the computer restart and window show below come.

fill the name of your computer and procced.


Step  9.
Use Recommended setting for windows update and setting if you have genuien window i.e. not a pirated copy of window else use the "Ask me later" option


Step  10.

Set Your system Date and Time and click the next button


You will be soon show the welcome screen.. congo you are successfully install your operating system..


 Thanks for reading my post.. :)

Wednesday, 2 May 2012

Windows 7 Easy Transfer Wizard to Back Up Your Data


Windows Easy Transfer is an inbuilt application to help people to transfer their data, account settings, applications installed from old PC to and New PC. Lot of Improvements have been Made on New Window Easy Transfer in Windows 7 based on the feedback of Windows Vista Users.
In Windows 7 Easy Transfer, people can transfer files in 3 ways
  • External Hard Drive,
  • PC-to-PC using Easy Transfer cable, and
  • Over a network.
1
If your PC is used by multiple persons or have different user profiles, Easy Transfer File wizard will show all the profiles so that you can select the user profile you want to copy and transfer to any external hard drive or to another computer.
In addition to selecting a Specific user profile, Windows 7 gives an additional feature to select what file to transfer and see all the files which are being transferred. It is now possible to select each file you want to migrate to another Pc and make changes per file basis.
The Same Enhanced Selectivity Feature which you get at the time of creating backups would be available to you at the time of restoring files also. You can select which file you want to restore from a backup as shown in following figure:
3
The Other New Feature Which You get in Windows 7 Easy Transfer is the Windows Easy Transfer Reports. After the Transfer is Complete , It is now possible to view a detailed report of which files had been transferred and where it was moved to , which programs were installed to your new pc complete with Links if possible.
Easy Transfer that is built right in Windows 7 is a very handy tool , if you have multiple computers and you want to transfer one user profile to another or you want to migrate your user profile from old Windows Version to Windows 7.
 Want More Tips on Windows 7 Comment Below the topic you want more.

chitika