Showing posts with label WINDOWS XP. Show all posts

Friday 18 May 2012

How to add Spell Checker in Notepad,Wordpad or any other

It happens many time when you need to check spelling in your articles or anything you had written.If you are using Microsoft Office products,then you can easily check the spelling of your written material.But what to do when you are using those text editor which lack the spell checking feature such as Notepad,Wordpad,Adobe etc.
At that moment you need a small tool known as "tinySpell".tinySpell can watch your typing on the fly and alert you whenever it detects a misspelled word.
add spell checker in notepad.wprdpad


It can also check the spelling of text that you copy to the clipboard.And one greatest feature of this tool is that you don't need to do any work,it automatically implement itself in Notepad and other stuffs.

Below is the list in which it adds spell checker:
  • Add spell checker in Wordpad and Notepad
  • Add spell checker in Pain or Photoshop Application
  • Add spell checker in When you save file as
  • Check spell when you chat 
  • Even when I am typing here.....
You can download "tinySpell" from below link:


To visit "tinySpell" checker homepage go here.
So,what do you think about this tool,leave your views below..

If this Helped you! Please take few Seconds and share it.

Tuesday 15 May 2012

Trick to change windows xp startup and shutdown tone

If you are get bored of windows xp startup and shutdown tone
than don't be panic its time to try something new.In this post
I am going to tell you a trick by which you can change your
computer's startup and shutdown tone to any other song or
tone which you like.By this method you can also change other
tones like windows Logoff and Logon,Empty Recycle Bin,etc.
Some simple steps are given below by which you can do this.


How to Change windows xp startup and shutdown tone
1.First of all go to start>Control Panel>Sounds and Audio
Devices>Sounds.
2.You will see a list of all the sounds,in this list select Start
windows as shown below.
3.Now click on Browse and give the path of the tone that you
want to use in the place of default tone.
4.Now click on OK and restart your windows,you will see the
change.
5.In the same way you can change any other tone.

Thursday 10 May 2012

REPAIR YOUR WINDOW XP WITHOUT INSTALLATION CD


CAN u REPAIR YOUR WINDOW XP WITHOUT INSTALLATION CD???
Impossible???? No its possible.. Do the following steps..


1. Click on START and then RUN.
2. Type webfldrs.msi (without quote)

 
This will start the process to repair your window's problems.
Follow the instructions.
In next screen, choose SELECT REINSTALL MODE.
A new window will appear.
Put check marks on all the options and click OK.
This will take few minutes so you can take rest and just go to cafeteria and enjoy COFFEE!
When the process will complete, it will ask for RESTART your pc.
Just Restart your computer and you will be amazed that you have
fixed the problems without having BOOTABLE or INSTALLATION CD.

Tuesday 8 May 2012

Windows Xp Installation Guide Step by Step Explaination


Many of You are using computer for many days and also using Windows XP as a operation system but yet dont aware of the installation of operating sytem to your computer.In this Post I am going to metion step wise installation of Windows XP

Many get afraid whenever format word come.As we know everybody love his computer/laptop so anything harm to our computer its really hurt all of us.


If anything wrong happen to our computer and we have to format it than we became sad and start thinging that farmating means losing all the data of your hard drive.


But its not completly true.Ya you will lose your Data but not the complete hard disk Data.If your computer is having three drive naming C: D: and E: and operating syatem file is present in C: Drive than it might be not necessary to formate the rest drives D: and E:. So you can save all Data present in D: and E:.


Unfortunatly if all Drive are infected with Virus than you should format the whole Harddisk but stll i prefer not to Format your PC because its not a easy task to Backup ur losed DATA.


I prefer not to format Your complete PC instead You can follow Steps mention 
here.

So if still your problem not solve after following the steps mention in 
link or any one want a fresh installation of windows XP than here I am going to mention you steps followed to FORMAT your syatem using Windows XP bootable CD.


Step 1.
 The first step should be you have Windows XP bootable CD with you.Now insert this CD into Your DVD/CD drive and reboot your system.

Step 2.
 As soon as You reboot a message as shown in below figure should apear.Than You have to press any key without delay.


If you not showing this message than you have to manually change your boot order by pressing function key just after restarting your computer and select option boot from opticle CD/DVD Drive.


*NOTE
 for diffrent computer the function key may be diffrent it may be F9 in some cases or F2 in other.Its better watch your computer screen while it booting.It show the option down there at right or left corner of screen with message press F-x key for boot menu.


Step 3.

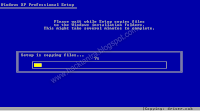
Now the next screen will come is shown bellow. so now you have to wait for sometime untile the OS check all drive and configuration of computer and start copying file to ur local drive.


Dont press any key in this stage wait for some time untile the next screen come which will be like below.


 Step-4
Now this is the screen where your computer ask for input.Select the partition in which you want to install the OS.

Note-
If you want to formate any partition than just select that partition and Hit Enter Button.

Next Screen will appear like this.


 Step-5
Here You have to Press key 'C' from your key bord.The next Screen come in front of you is shown Down below.Select carefully the option shown in figure(You can select any option but option selected in this figure is the best as I prefer)


Here You have to select The 3rd optin than Hit Enter From Your Keybord.Now Next Screen is shown bellow where You have to press the F key from your keybord to start the formating and copying process as shown in bello figures.


 Step-6
After Finishing the above state You are requested to restart your computer.Generally its happen automatically but if not just restart your computer.

Again you are encounter with this message BUT THIS TIME DONT PRESS ANY KEY ... leave it as it is and let your computer start.once again I warn Dont press any key after showing below figure 2nd time.


**DONT PRESS ANY KEY THIS TIME


now your computer will start as usual and halt in below shown screen.


 Step-7
When the above screen shown than you have to wait for 20-30 min untile it finish all installation process.

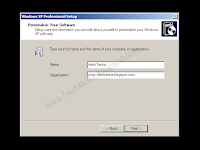
after this you have to do is only few form filling jobs like provide your name ,organisation or set password for admin.So whenever they appear just fill it and click next.Your installation will resume autometically.You may be also ask for product key during this process so provide your valid product key.


I am providing one images which help you to understand how they might be..


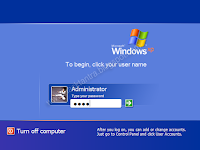
Now you are Done Just let The Window restart You will soon see the logon window(only if you provided the administrator password if not than your are directly shown Your Desktop ).


Provide Your password here and Enjoy the freshly installed windows XP to ur Computer.

Make Virus infected Computer Virus Free Without Format


 Useually Many People Are tired of their Virus infected computers(running windows os only).In such situation virus even dont allow you to install any software like antivirus or even you cant open your command prompt.Some of you even dont have antivirus.Than only option infront of you is to format your computer/laptop.
But this is not the only solution.Formating required lots of time also you gona loss your all data(atleast data from drive containing your os).Every one Dont know how to format computer.They probably prefer to go to the Computer Expert and give them money to repair their computer/laptop.
So why not try a alternative method which care your computer and free it from viruses.
Here I am going to mention some easy steps which gona care your computer.You have to download only few software which is not more than few MBs in size.I am providing you link for them.

I also Give You link of Few free Antivirus at the end so that you can permanently remove Your virus.


1
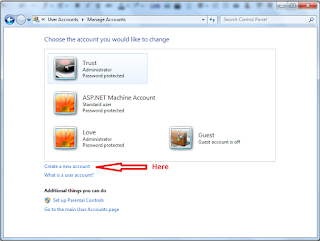
.First of all you have to go to the user account control of your and create a new user account..


**
remember that you should create a account with a standared user NOT A ADMINISTRATOR .


2. Now after creating a standared user account log off ur current account and relogin with the new account you created.


3.
Beware Dont click any link or any popup application in this account untile you finish the whole procedure.Even dont run any application which is install previously.

4.
Now Download the free antivirus from here  Click Here

5.
Downlaod the Advance System Care from here  Click here

6.
Both of above are Free software (add free) so Download its free Version only.

7.
Now Install Antivirus First to Your computer.

8.
While Installing the program required a administrator privillage.So provide your Administrator password their.In case of windows XP user You have to right click the program and run it as the Administrator

**Note
 You should know your Admin account name and password so keep that in mind.

9.
Now after finishing the installation Run full scan of Your Computer.

10.
All of your virus will detected by antivirus and ur computer is free from virus.

11.
Now install the Advance Syatem Care software to You computer and run it.After running this software You will find a option deep care click that button.
After compliting the process click the fix button.

**Note
 Again while Installing the program required a administrator privillage.So provide your Administrator password their.In case of windows XP user You have to right click the program and run it as the Administrator

12.
After this Your computer is clean and free from all type of virus and bad things.

13.
 You can now use that old  administrator account I prefer not to use your old user account(Administartor account).If its not necessary for you to use that old account than i prefer dont use that.Create a new account with Administrator rights.

14.
 Enjoy

How To Increase Your Internet Bandwidth Speed


Many of You are suffered from the low bandwidth of your Internet Connection.Some time we are unable to effort the high bandwidth internet and than the Internet Speed is big headache for us.

Question is Did we utilize our complete broadband speed for our Browsing or Downloading??

Obviously answer is no that's why I am writing this post for you.In windows Operating System 20 % bandwidth is always reserved for QoS Packet Scheduler.Actually If we have slow connection than we can change that setting so that we can use our 100 % Internet connection speed. Means by changing QoS Packet Scheduler setting we can Increase our Internet bandwidth Speed by 20 %.Its not less amount.So lets Try it.

Steps to Increase your Internet Speed or Bandwidth!!


Follow these simple step and get increase your Internet speed by 20%
1.Go to run dialogue (Press Window+R) window and type command gpedit.msc.
2.A new window will open.Go to Computer Configuration.


3.Next Go to Administrative Template
4.Go to Network
5.Go to QoS Packet Scheduler 
6.Double Click on Limit reservable bandwidth.


7.Enable it by selecting the enable radio button.
8.Set Bandwidth Limit to 0%.

9.Click Ok and restart your computer.
10.You are done enjoy your 20% higher Internet Speed.

Windows Xp Hacking Techniques


Hello Friends In this Post I am Going to describe few methods to Hack The Windows Xp Admin Account.Few of Them are Old but still very effective way to hack any ones XP account.

Techniques for Hacking Windows Xp


1.Direct Hacking

This is Best method among all if work.This is easiest method to Hack Windows Xp account.To Hack Windows Xp Account you just need to go to login screen first.If computer is switched off than switch it on and wait until log on screen come.
Now Press CTRL+ALT+DEL two times and you will prompt with a new dialogue box shown bellow.
In The Above username field enter the Administrator as shown in above figure.And leave password blank.Hit Enter.If you are lucky one soon you will be see a welcome screen.
How it work:-
During Xp installation time if we do not set password to administrator account than this account remain in existence without any password.So if we use Administrator as username than it will direct login to windows without asking any password.

2.Hack Windows Xp using interactive command(By task scheduler)

This method is also effective but you need to have a loged in account with admin privileged.
Steps are follow.
(i)First run command prompt(cmd)
(ii)Type the command at 3:00 /interactive cmd 
The time shown in above code must be few minutes after your current time.For example if your clock showing current time as 3:00 AM than you enter 3:02.If its showing 1:00 PM than you can enter 13:03 in above code.
Now hit enter.Wait for some time(until system time reach to time set by you).After that a new window will appear.
(iii)Now close the previous cmd window and open task manager.Kill or end the process explorer.exe from running processes in task manager.
(iv)Now go to the new cmd window(which is just opened) and type command explorer.A new explorer will open but you have a administrator privilege.You can access every thing through this account.

3.Change Administrator Password using net user command

You can change the password of any user in windows by using net user command.
Steps:-
1.Go to cmd(you must have administrative privilege for doing this)
2.type command net user USER_NAME PASSWORD and hit enter,
3.Where username is username of account whose password you want to change.
4.After this the password of the account will be changed.

Speed Up Windows Performance Using Ready Boost


Hi friends I posted a lot of articles on How To Increase PC Speed,I am here with one more article to boost up your PC.Windows Ready Boost allows Windows Vista, Windows 7, and Windows 8 to use compatible USB flash drives as cache instead of the hard drive. This is faster because it has been shown that small random reads and writes on flash RAM can be 8-10 times faster than caching them to one of your hard drives. In order to really benefit from this new feature, Microsoft suggests that you provide enough space on a flash drive for Ready Boost so that you are in at least a 1:1 ratio with your installed physical RAM. 

You will also need to use flash drives that meet the following specifications:

  • At least 1GB of storage capacity
  • The flash device must have at least 512MB free
  • 5 MB/sec throughput for random 4k reads across the entire device
  • 3 MB/sec throughput for random 512k writes across the entire device

 If you are lucky, your existing flash drive may already be compatible. 

  • Click here To Know How To Increase your browsing and downloading speed
Enabling Windows ReadyBoost:

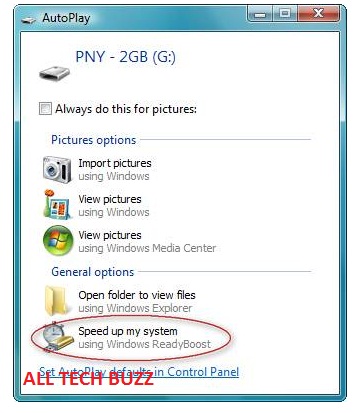
In order to get started using Windows Ready Boost, it is as simple as plugging a Ready Boost compatible flash drive into your Windows computer's USB port. If it is a compatible drive, Windows will detect it and display a prompt asking what you would like to do with this drive.


  • Click Here To Download Internet Download Manager Full Version
To assign this flash drive as the Ready Boost device on your computer, simply click on the Speed up my system using Windows Ready Boost option. When you click on that option a new screen will appear showing the Ready Boost properties.


Apply and then hit OK.Now you can feel the improvement in your PC speed.

Monday 30 April 2012

How to Lock folder on windows using recycle bin

Hello friends, here i am going to share tip which will help you to lock folder for  protecting  your important data as well as data that required to lock for preventing access. there are lots of utilities available that will help you to achieve this, but all are some how trial version or limited version.
So, if you want to lock folder on your pc please follow below steps. note that these  changes are under windows registry so, avoid to  implement if you are not well enough technically known person :)
here are the way you can lock any folder using recycle bin :
  • open Run in your computer or press (ctrl +R) and type ‘regedit‘ command
  • You can list of  keys  and relates values.navigate through list until you find CLSID no of recycle bin in registry editor
For example:
CLSID no of recycle bin  is >>  {645FF040-5081-101B-9F08-00AA002F954E}
  • Now its time to lock folder using recycle bin so, lets say you want to lock folder named ‘Folder1′
so inside notepad editor type  following text like
ren folder1 recycle.{645FF040-5081-101B-9F08-00AA002F954E}
and save that files as lock.bat
  • To unlock related Lock folder , you can create another batch file which will unlock folder.Type below line in another notepad file and  save that as ‘unlock.bat’
ren recycle.{645FF040-5081-101B-9F08-00AA002F954E}
So, when ever you want to lock  folder execute created lock.bat and reverse execute unlock.bat for locking folder

How to Disable USB port on Windows Xp machine

USB keys are now a days  not just a popular way to sneak data out from companies, unhappy employees may use USB ports for delivering trojans or spyware into the company networks.
Now some smart admins disable usb drive by changing the BIOS settings and then lock the BIOS using passwords. Some not so-smart admins fix tapes over the USB ports to prevent employees from inserting any USB device into their computer.
When you do this, the USB storage device does not work when the user connects the device to the computer.
However, both these approaches can prove to be counter-productive as your staff can no longer use USB keyboards, wireless mouse, digital cameras, camcorders, scanners, printers or even USB microphones to their computers.
So a more reasonable option for sysadmins is to disable write access to USB port so that data files cannot be written to the mass storage device. The USB thumb drive will be read-only.
Open the Windows Registry and open the following key
HKEY_LOCAL_MACHINE\System\CurrentControlSet\ Control\StorageDevicePolicies
Now add a new DWORD called WriteProtect and put the value as 0 to disable write privileges to the USB port. To reverse the step, either delete the WriteProtect REG_DWORD or toggle the value to 1 which will enable the port.
Remember that the above trick works only with Windows XP SP2.

How to Disable USB ports in window xp

    1. Click Start, and then click Run. In the Open box, type regedit, and then click OK.
    2. Locate and then click the following registry key:
HKEY_LOCAL_MACHINE\SYSTEM\CurrentControlSet\Services\UsbStor
In the details pane, double-click Start.
In the Value data box, type 4, click Hexadecimal (if it is not already selected), and then click OK.
  1. Exit Registry Editor.

How to re-enable a disable ports in Windows

    1. Click Start, and then click Run. In the Open box, type regedit, and then click OK.
    2. Locate and then click the following registry key:
HKEY_LOCAL_MACHINE\SYSTEM\CurrentControlSet\Services\UsbStor
In the details pane, double-click Start.
In the Value data box, type 3, click Hexadecimal (if it is not already selected), and then click OK.
  1. Exit Registry Editor

Sunday 22 April 2012

How to access files and programs in windows

Let me ask you a question first. If you have to open a new word document or create a new spreadsheet, what do you do?
Most of us go to the installed software location and click on the respective icon to open a new document. There is another much simpler way to perform these kinds of task by using run command in Windows XP and other prior versions. In Windows 7, Microsoft have gone one step further towards the Macintosh way and introduced a really cool feature. So we will discuss Windows XP and Window 7 separately.

Window XP

For windows XP, open run command. This can be done either by pressing windows key + R or by going into start menu and then clicking ‘Run’. Now in the command menu type the following commands and press enter for different results. Please note that there is zillions of run command possible. We are not going to list all of them, just for the sake of listing. The list here covers only the most basic features that a normal computer user employs.
Microsoft  Word
winword
Microsoft Excel
excel
Add/Remove Programs
appwiz.cpl
Administrative Tools
control admintools
Adobe Acrobat (if installed)
acrobat
Adobe Designer (if installed)
formdesigner
Adobe Photoshop (if installed)
photoshop
Calculator
calc
command prompt
cmd
check disk utility
chkdsk
Bluetooth transfer Wizard
fsquirt
Clipboard Viewer
clipbrd
control panel
control
date and time properties
timedate.cpl
Disk Cleanup Utility
cleanmgr
Disk Defragment
dfrg.msc
Display Properties
control desktop
Display Properties
desk.cpl
Display Properties (w/Appearance Tab Preselected)
control color
Firefox (if installed)
firefox
Folders Properties
folders
Fonts
control fonts
Fonts Folder
fonts
Free Cell Card Game
freecell
Hearts Card Game
mshearts
Internet Connection Wizard
icwconn1
Internet Explorer
iexplore
Internet Properties
inetcpl.cpl
Internet Setup Wizard
inetwiz
IP Configuration (Display Connection Configuration)
ipconfig /all
Keyboard Properties
control keyboard
Logs You Out Of Windows
logoff
Microsoft Access (if installed)
msaccess
Microsoft Chat
winchat
Microsoft Excel (if installed)
excel
Microsoft Frontpage (if installed)
frontpg
Microsoft Movie Maker
moviemk
Microsoft Paint
mspaint
Microsoft Powerpoint (if installed)
powerpnt
Microsoft Word (if installed)
winword
Microsoft Syncronization Tool
mobsync
Minesweeper Game
winmine
Mouse Properties
control mouse
Mouse Properties
main.cpl
Nero (if installed)
nero
Netmeeting
conf
Network Setup Wizard
netsetup.cpl
Notepad
notepad
On Screen Keyboard
osk
Outlook Express
msimn
Paint
pbrush
Pinball Game
pinball
Printers and Faxes
control printers
Real Player (if installed)
realplay
Remote Desktop
mstsc
Scheduled Tasks
control schedtasks
Shared Folders
fsmgmt.msc
Shuts Down Windows
shutdown
Sounds and Audio
mmsys.cpl
Spider Solitare Card Game
spider
System File Checker Utility (Scan Immediately)
sfc /scannow
System File Checker Utility (Scan Once At The Next Boot)
sfc /scanonce
System File Checker Utility (Scan On Every Boot)
sfc /scanboot
System File Checker Utility (Return Scan Setting To Default)
sfc /revert
Task Manager
taskmgr
User Account Management
nusrmgr.cpl
Utility Manager
utilman
Windows Address Book
wab
Windows Explorer
explorer
Windows Firewall
firewall.cpl
Windows Magnifier
magnify
Windows Media Player
wmplayer
Windows Messenger
msmsgs
Windows Picture Import Wizard (need camera connected)
wiaacmgr
Windows System Security Tool
syskey
Windows Version (to show which version of windows)
winver
Windows XP Tour Wizard
tourstart
Wordpad
write

Windows 7

Accessing different programs and files on a windows platform was never so easy. Just press the windows key and start typing whatever program you want to access. The search feature in the windows very quickly indexes the content on the system and starts returning the results. Now there is no need to remember the commands for each and every program. Simply type the name of the program and choose from the available menu. Moreover it will also show all the files that have the string you are searching in their content. So if you have you resume or CV in your system drive and you forgot where you saved it. Simply type in your name in the search menu and the file will be returned in the search results. (Assuming you have written your name in your own resume!)

DON'T USE CTRL + C

when you are using it on internet
Its not the safe thing to do when you are online.

What happens when you press Ctrl+C while you are Online?
This copied data is stored in clipboard and is accessible from the net by a combination of Javascripts and ASP.
yes its true
if u dont believe me
Just try this:
1) Copy any text by Ctrl + C
2) Click the Link:
http://www.sourcecodesworld.com/special/clipboard.asp
3) You will see the text you copied was accessed in the above address.
so please don't keep sensitive data (like passwords, credit
card numbers,PIN etc.)in the clipboard while surfing the web.

how to stop this?
You can stop other from hacking your clipboard content by doing this:
Go to internet option of explorer
tools menu ->Internet option -> Security Custom level
In settings - disable the option
allow past operations via script.

Thursday 19 April 2012

How to Install Windows XP

This procedure demonstrates how to install Windows XP Professional. The procedure to install Windows XP home edition is very similar to the professional edition. Since Windows XP Pro is more advanced operating system, it will be used to demonstrate the installation procedure.
The best way install Windows XP is to do a clean install. It is not difficult to perform a clean installation. Before you perform the installation I recommend that you check Windows XP Compatibility List to ensure that your hardware is supported by XP. If your hardware is not on the compatibility list you can check your hardware manufactures website to download the drivers for Windows XP. Save all the necessary drivers onto floppy disks or CD before you start the installation.
All versions of Windows XP CD are bootable. In order to boot from CD/DVD-ROM you need to set the boot sequence. Look for the boot sequence under your BIOS setup and make sure that the first boot device is set to CD/DVD-ROM. You can then perform the following steps to install Windows XP:
Step 1 - Start your PC and place your Windows XP CD in your CD/DVD-ROM drive. Your PC should automatically detect the CD and you will get a message saying "Press any key to boot from CD". Soon as computer starts booting from the CD your will get the following screen:
Windows XP Screenshot - Click to enlarge
Step 2 - At this stage it will ask you to press F6 if you want to install a third party Raid or SCSI driver. If you are using a an IDE Hard Drive then you do not need to press F6. If you are using a SCSI or SATA Hard drive then you must press F6 otherwise Windows will not detect your Hard Drive during the installation. Please make sure you have the Raid drivers on a floppy disk. Normally the drivers are supplied on a CD which you can copy to a floppy disk ready to be installed. If you are not sure how to do this then please read your motherboard manuals for more information.
Windows XP Screenshot - Click to enlarge
Step 3 - Press S to Specify that you want to install additional device.
Windows XP Screenshot - Click to enlarge
Step 4 - You will be asked to insert the floppy disk with the Raid or SCSI drivers. Press enter after you have inserted the disk.
Windows XP Screenshot - Click to enlarge
Step 5 - You will see a list of Raid drivers for your HDD. Select the correct driver for your device and press enter.
Windows XP Screenshot - Click to enlarge
Step 6 - You will then get a Windows XP Professional Setup screen. You have the option to do a new Windows install, Repair previous install or quit. Since we are doing a new install we just press Enter to continue.
Windows XP Screenshot - Click to enlarge
Step 7 - You will be presented with the End User Licensing Agreement. Press F8 to accept and continue
Windows XP Screenshot - Click to enlarge
Step 8 - This step is very important. Here we will create the partition where Windows will be installed. If you have a brand new unformatted drive you will get a screen similar to below. In our case the drive size is 8190MB. We can choose to install Windows in this drive without creating a partition, hence use the entire size of the drive. If you wish to do this you can just press enter and Windows will automatically partition and format the drive as one large drive.
However for this demonstration I will create two partition. The first partition will be 6000MB (C: drive) and second partition would be 2180MB (E: drive). By creating two partition we can have one which stores Windows and Applications and the other which stores our data. So in the future if anything goes wrong with our Windows install such as virus or spyware we can re-install Windows on C: drive and our data on E: drive will not be touched. Please note you can choose whatever size partition your like. For example if you have 500GB hard drive you can have two partition of 250GB each.
Press C to create a partition.
Windows XP Screenshot - Click to enlarge
Step 8 - Windows will show the total size of the hard drive and ask you how much you want to allocate for the partition you are about to create. I will choose 6000MB. You will then get the screen below. Notice it shows C: Partition 1 followed by the size 6000 MB. This indicates the partition has been created. We still have an unpartitioned space of 2189MB. Next highlight the unpartitioned space by pressing down the arrow key. Then press C to create another partition. You will see the total space available for the new partition. Just choose all the space left over, in our case 2180MB.
Windows XP Screenshot - Click to enlarge
Add caption
Step 9 - Now you will see both partition listed. Partition 1 (C: Drive) 6000MB and Partition 2 (E: Drive) 2180MB. You will also have 8MB of unpartitioned space. Don't worry about that. Just leave it how its is. Windows normally has some unpartitioned space. You might wonder what happened to D: drive. Windows has automatically allocated D: drive to CD/DVD-ROM.
Select Partition 1 (C: Drive) and press Enter.
Windows XP Screenshot - Click to enlarge
Step 10 - Choose format the partition using NTFS file system.This is the recommended file system. If the hard drive has been formatted before then you can choose quick NTFS format. We chose NTFS because it offers many security features, supports larger drive size, and bigger size files.
Windows XP Screenshot - Click to enlarge
Windows will now start formatting drive C: and start copying setup files as shown on the two images below :
Windows XP Screenshot - Click to enlarge
Step 11 - After the setup has completed copying the files the computer will restart. Leave the XP CD in the drive but this time DO NOT press any key when the message "Press any key to boot from CD" is displayed. In few seconds setup will continue. Windows XP Setup wizard will guide you through the setup process of gathering information about your computer.
Windows XP Screenshot - Click to enlarge
Step 12 - Choose your region and language.
Windows XP Screenshot - Click to enlarge
Step 13 - Type in your name and organization.
Windows XP Screenshot - Click to enlarge
Step 14. Enter your product key.
Windows XP Screenshot - Click to enlarge
Step 15 - Name the computer, and enter an Administrator password. Don't forget to write down your Administrator password.
Windows XP Screenshot - Click to enlarge
Step 16 - Enter the correct date, time and choose your time zone.
Windows XP Screenshot - Click to enlarge
Step 17 - For the network setting choose typical and press next.
Windows XP Screenshot - Click to enlarge
Step 18 - Choose workgroup or domain name. If you are not a member of a domain then leave the default settings and press next. Windows will restart again and adjust the display.
Windows XP Screenshot - Click to enlarge
Step 19 - Finally Windows will start and present you with a Welcome screen. Click next to continue.
Windows XP Screenshot - Click to enlarge
Step 20 - Choose 'help protect my PC by turning on automatic updates now' and press next.
Windows XP Screenshot - Click to enlarge
Step 21 - Will this computer connect to the internet directly, or through a network? If you are connected to a router or LAN then choose: 'Yes, this computer will connect through a local area network or home network'. If you have dial up modem choose: 'No, this computer will connect directly to the internet'. Then click Next.
Windows XP Screenshot - Click to enlarge
Step 22 - Ready to activate Windows? Choose yes if you wish to active Windows over the internet now. Choose no if you want to activate Windows at a later stage.
Windows XP Screenshot - Click to enlarge
Step 23 - Add users that will sign on to this computer and click next.
Windows XP Screenshot - Click to enlarge
Step 24 - You will get a Thank you screen to confirm setup is complete. Click finish.
Windows XP Screenshot - Click to enlarge
Step 25. Log in, to your PC for the first time.
Windows XP Screenshot - Click to enlarge
Step 26 - You now need to check the device manager to confirm that all the drivers has been loaded or if there are any conflicts. From the start menu select Start -> Settings -> Control Panel. Click on the System icon and then from the System Properties window select the Hardware tab, then click on Device Manager.
Windows XP Screenshot - Click to enlarge
If there are any yellow exclamation mark "!" next to any of the listed device, it means that no drivers or incorrect drivers has been loaded for that device. In our case we have a Video Controller (VGA card) which has no drivers installed.
Your hardware should come with manufacturer supplied drivers. You need to install these drivers using the automatic setup program provided by the manufacturer or you need to manually install these drivers. If you do not have the drivers, check the manufacturers website to download them.
To install a driver manually use the following procedure:
(a) From the device manager double click on the device containing the exclamation mark.
(b) This would open a device properties window.
(c) Click on the Driver tab.
(d) Click Update Driver button. The Wizard for updating device driver pops up as shown below:
Windows XP Screenshot - Click to enlarge
You now get two options. The first option provides an automatic search for the required driver. The second option allows you to specify the location of the driver. If you don't know the location of the driver choose the automatic search which would find the required driver from the manufacturer supplied CD or Floppy disk. Windows would install the required driver and may ask you to restart the system for the changes to take affect. Use this procedure to install drivers for all the devices that contain an exclamation mark. Windows is completely setup when there are no more exclamation marks in the device manager.

chitika